domingo, 11 de abril de 2021

PATRÓN GRATIS JERSEY DE BEBÉ 3-6 MESES

PATRON GRATIS CHAQUETA BEBE


An intermediate level project.   Supplies: 1 ball Bernat SofteeBaby, US size 2 and 4 straight needles, size 2 and 4 dpn's, 5 stitch holders (one 6-inch, 4 small), crochet hook, 5 ½-inch buttons
Gauge: 22 rows = 2", 13 st = 2" approx. Finished size: 10" across chest, buttoned, 10 ½" long, collar-to-cuff about 10" If you want a sweater about 1" wider, go up to #3 and #5 needle sizes. For a tiny, newborn size, use Lion Baby Soft and sizes #1 and #3 needles

c/o 145 st. on smaller needle. First and last 5 sts form garter stitch buttonhole bands. Every garter stitch ridge is made up of 2 rows.
1. K 5, K 1, P 1 across, end K 5
2. K 5, P 1, K 1 across, end K 5
3. As Row 1
4. As Row 2
5. Buttonhole row— as Row 1. Work buttonhole at beginning of row for girl (K2, y/o, K2tog, K1) or for boy at the end of the row. Place contrasting wool markers at opposite end of buttonhole row to facilitate counting rows. Work a buttonhole every 12th garter stitch ridge. (24 rows)
6. As row 2
7. As Row 1
8. As Row 2
9. As Row 1
10. As Row 2
11. As Row 1: Work 73 sts (half a row) , increase in next stitch, finish row. (=146 sts)
12. Change to larger needle. (w.s.) K 5, P across, K last 5
13. K 5, P 6, K 4, *P 8, K 4*  Repeat between *'s across, ending P 6, K 5
14. K 5, K the K's, P the P's across, end K 5
15. As Row 13
16. K 5, P across, end K 5
17. K 5, K 4, *P 8, K 4* across, end K 5
18. K 5, P the P's, K the K's across, end K 5
19. As Row 17
20. K 5, P across, end K 5
Work pattern Rows 13 through 20 until there are 54 rows over ribbing,  ending on w.s. Be sure to put in a buttonhole every 12th garter ridge (24 rows). The basket-weave pattern will show 13½ reeds and ribs (think of those  beautiful Longaberger baskets!).

Left Front:  (r.s.) Work 35 sts in pat. Put on holder. Work 4 st, put on holder. Work 68 st, put on holder. Work 4 st, put on holder. 35 sts remain on needle. This will be the left front. Be sure to put in buttonholes at same interval. Line up pattern repeats carefully and always work within pattern!
K 2 tog., work to end in pattern.
Work 1 row (w.s.).
K 2 tog., work to end in pattern.
Work 1 row (w.s.).
K 2 tog., work to end in pattern.(=32 sts)
Work even on these 32 sts always staying in pat,.until there are 8 full garter ridges (16 rows) over Buttonhole #4. Work one more row, ending on w.s.
Work 17 sts. Place last 15 sts on holder for neck without working.
Turn work. P 2 tog., work to end.
Work 1 row.
P 2 tog., work to end (=15 sts)
Work even for 9 rows, ending at neck edge. Score:                 
(w.s. ) Work 8, turn
Work 8, ending at neck edge. Leaving a 24" tail, cut yarn. Place 15 sts onto a dpn, and secure stitches with a rubber band.

Right Front: Join yarn at armhole edge. Begin work on w.s. Do the three decreases on the w.s. and work shaping to mirror the left front. When same length as the left front, on r.s., work 15 st., place on holder. Then do the 2 neck decreases and shoulder shaping to correspond to the opposite front.

Back: Put 68 sts from holder back on needle. Join yarn to be able to begin on w.s.
Decrease at beginning of this row, and 5 subsequent rows. (=62 sts)
Work even on 62 sts until armhole depth is the same as for the front pieces, where shoulder shaping starts, ending on r.s

Shape shoulders: w.s. work to within 7 sts of end. Turn
r.s. Work to within 7 ts. of end. Turn
w.s. Work to within 15 sts of end. Turn
r.s. Work to within 15 sts of end.
Place center neck 32 sts on holder. Cut off yarn.

Shoulder seaming: Put each set of 15 shoulder sts onto a #4 dpn. With the wrong sides of sweater facing out, hold right front and back shoulders together and using the 24-inch tail, do a 3-needle bind-off.  (Google "3-needle bind-off" if you do not know this technique) I like to use a crochet needle to do this. Repeat for other shoulder.

Collar: Turn sweater right-side-out.  Put the 15 sts that are on the holder for the left front collar on to needle. Attach yarn at neck edge and work these 15 st (r.s.) in pattern, ending at the button band. (This should finish out pattern sequence)
Next row: w.s. Using smaller needle, K 5, P 10, pick up and Purl 12 sts., put the center back sts onto free needle and P across, pick up and P 13 sts from right side of neck, put right neck holder stitches back on needle and P to within 5 sts of end, K 5.  (=87 sts). You want to have an odd number.
Next row: (r.s.) K 5, do K 1 P 1 ribbing across the row, end K 5
Continue ribbing, putting in the 6th buttonhole where needed. Work a few more rows to desired collar depth and bind off.

Sleeve: At armhole— using the smaller dpn's to pick up stitches, pick up 48 sts (22 from front, 22 from back, 4 underarm) onto needles without working.  Arrange the needles so that the starting point will be at the center of the 4 live underarm stitches.

Join yarn at center of underarm stitches. Place marker. Using the larger dpn's, begin working pattern. Note: When working in the round, the P rows in the body pattern will now be done as all K rows.

1. K 1 round
2. K 2 *P 8, K 4* around, end K 2
3. Repeat Rnd 2
4. Repeat Rnd 2
5. K 1 round
6. P 4, *K 4, P 8* around, end P 4
7. Repeat Rnd 6
8. Repeat Rnd 6

Continue to work even on 48 sts, repeating Rounds 1 through 8 until
about 1½ " short of desired length, ending on Round 4 or 8.
Next round: Change to smaller needles. K 4, K 2 tog around (=40 sts)
Work K 1, P 1 ribbing to desired depth. Bind off loosely in ribbing.
Do second sleeve to match.
Work in loose ends and sew buttons on securely.

This  basket weave knit baby sweater is appropriate for a boy or girl. The textured knit looks best in solid colors. My personal favorite is yellow or off-white.

PATRONES GRATIS ABRIGO DE BEBÉ


Hoy os comparto esta reliquia ; un antiguo patrón de abrigo para bebé tipo chaleco , sin mangas 

Se trata de un patrón de la revista Phildar de 1970 , aunque hay tejedoras mayores que afirman que ya hacían este modelo en el año 56 , ya ha llovido desde entonces 

Materiales necesarios para tejer este abrigo : 

Lana suave de bebé 

Agujas número 2 1/2 


Lana fina, tejida con agujas n ° 2.5 para las costillas y n ° 3 para el punto jersey. La puntada decorativa es simple y complicada al mismo tiempo, hay que tener una noción de puntadas caladas (lazada, overlock doble), que realmente no dominé. ¡Ahora estoy arriba!

Hice 2 ojales en las costillas pero también puedes coser una cinta a cada lado y también agregué dos ojales para las anillas para que el bebé se beneficie un poco más.

Aquí están las explicaciones:


tamaño desde el nacimiento hasta los tres meses: 1 ovillo de lana: muestra: 39 rg / 29 m =

aguja de 10 cm n ° 2.5 para el punto musgo y n ° 3 para el

patrón de punto fantasía en resorte calado en número m múltiplo de 4 + 1
1a fila: * m env, 3m final * rep de * a * final con 1 m env
2a y 4a fila: * 1m final, 3 m env * rep desde * a * final con 1a
3a fila : * 1 revés, 1 lazada, 1 overlock doble (deslizar 1 pt sin tejer, tejer los 2 pts siguientes juntos de derecho, pasar el pt deslizado sobre los 2 pts tejidos juntos), 1 lazada * repetición de * a * terminar con revés 1
siempre repetir estos 4 filas.


Empiece a tejer desde la zona lumbar .
Mon 67 pts, ag no 2.5, tejer 1/1 resorte por 2.5 cm comenzando con 2 d. Por el LD a cada lado.
Continuar en el punto fantasía n. ° 3 tejiendo los 5 pts al inicio de la fila, a cada lado en pt musgo.
Cuando la parte superior del punto fantasía es de 12 cm, es decir, 14,5 cm en total, tejer los 23 pts centrales en punto musgo por 2 cm y luego rematar los 13 pts centrales para el escote
continuar un lado a la vez en los 27 pts de un lado tejiendo los 5 pts de cada lado en pt musgo y los 17 pts centrales del lado en el patrón.
Tejer recto 14 cm y dejar en un gancho auxiliar mientras el otro lado se hace igual.
juntar los dos frentes en una ag y tejer resorte 1/1 de la aguja no 2.5 colocando 2 pts derecho por el LD a cada lado y tejer la 1a hilera tejiendo los 5 pts en pt musgo en ambos frentes juntos (el frente derecho en el delantero izquierdo para el efecto "cruzado") Quedan 49 pts
a 2.5 cm de altura del resorte rematar todos los pts.
devolver los hilos y coser las cintas para atar el calientacorazones

miércoles, 20 de junio de 2018

La Martinica by María Sobrino

La Martinica by Maria Sobrino. Colección Primavera-Verano 2018

Sin duda una de las marcas que mayor expectación provoca en el mundo de la  moda infantil es La Martinica.

La diseñadora y creadora de la firma María Sobrino consigue temporada tras temporada crear colecciones que no deja nunca indiferentes a las numerosas amantes  del diseño para niños .

Un verano más María llena nuestros armarios de colores frescos y alegres con sus colecciones aptas para varios estilos .
Desde el look desenfadado y ponible para uso diario hasta un estilo más elegante para esas ocasiones especiales .

María viste a nuestros niños y niñas desde bebés con el saber hacer de las mejores profesionales del mundo de la confección ifantil

FAMILIA SALOBREÑA

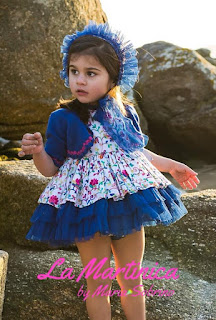
jesusito  salobreña, tela bordada con flores multicolor y motivos en tul azul eléctrico.

vestido la martinica


 Bombacho y   jersey Salobreña


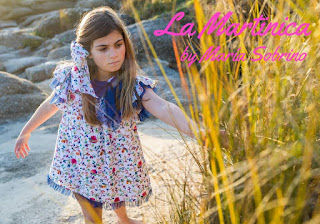
Fijaos en el gran escote trasero de este    jersey de hilo azul eléctrico con detalles  de  tul a tono

Va conjuntado con un short bordado con flores de varios colores  conjunto ideal para mañanas o tardes de primavera 

Foto Cocoella


Vestido corte trapecio modelo Salobreña de La Martinica by Maria Sobrino Moda infantil. Estampado , con bordado de flores sobre fondo blanco en tonos fucsia, azulón, amarillos.. LLeva doble volante en hombros, uno de la tela y otro en tul azulón, al igual que lazada en el cuello.


vestido niña la martinica


conjunto niño la martinica


Un  vestido ideal para lucir este verano., de lineas sencillas y estampado alegre .
 De corte recto confeccionado  con un fabuloso tejido bordado de flores en varios tonos    y adornado con detalles de tul azul eléctrico


llenos de elegancia y distinción.


Texto de la columna de la Izquierda
FAMILIA CANDY


FAMILIA DUMBO


No podían faltar    los cuadros , en esta ocasión de tamaño grande ,  Que bonito el jesusito de esta colección , de tela de cuadros azul y blanco , todo rematado con puntilla en beige


Foto Dioni Moda Infantil

Foto Dioni Moda Infantil

Foto Dioni Moda Infantil


FAMILIA COCOELLA

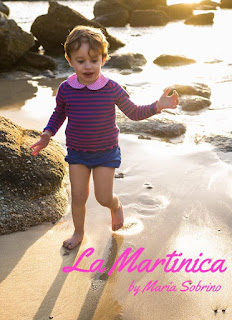
Esta colección de leves toques marineros combina el tejido liso marino , con puntilla blanca y cuadro vichy tostado.


Foto Dioni Moda Infantil

Foto Dioni Moda Infantil


Foto Cocoella


FAMILIA NAUTILUS


Esta coleccion de la Martinica destaca por en marcado estilo marinero 
La tela es un essstampado de pequeños cuadros y otra vez el rojo de lazos y tules es el que aporta el toque de color 


Foto Dioni Moda Infantil

Foto Dioni Moda Infantil

Foto Dioni Moda Infantil


FAMILIA CARMELA


Texto de la columna de la derecha


Foto Cocoella


FAMILIA  TULIPÁN


Foto Dioni Moda Infantil

Foto Dioni Moda Infantil


Foto Dioni Moda Infantil

Foto Dioni Moda Infantil


Foto Dioni Moda Infantil

FAMILIA CAMPINA

Una colección que combina grandes cuadros vichy celeste y  blanco con un  toque de color que le aportan  los grandes  lazos en rojo 
A destacar la espalda descubierta de tirantes adornados con volantes